 Translate
Your Vigiles Prime 30-day Evaluation: Part 1 – Getting Started with the Core Features


Getting A Software Bill of Materials (SBOM)/Manifest Into Your Account

Sample Manifest
From Yocto
From Buildroot
From within Timesys Desktop Factory
From a Software Bill of Materials (SBOM) in .csv format
With the Create Manifest Wizard
Scanning Your SBOM/Manifest

Vigiles automatically triggers a scan of the SBOM/manifest specific to your product configuration against a Timesys-curated vulnerabilities database.
Reading/Interpreting the CVE Scans

The CVE dashboard page is made up of three sections. Here’s how to interpret the results of your scan:
1. Summary Section
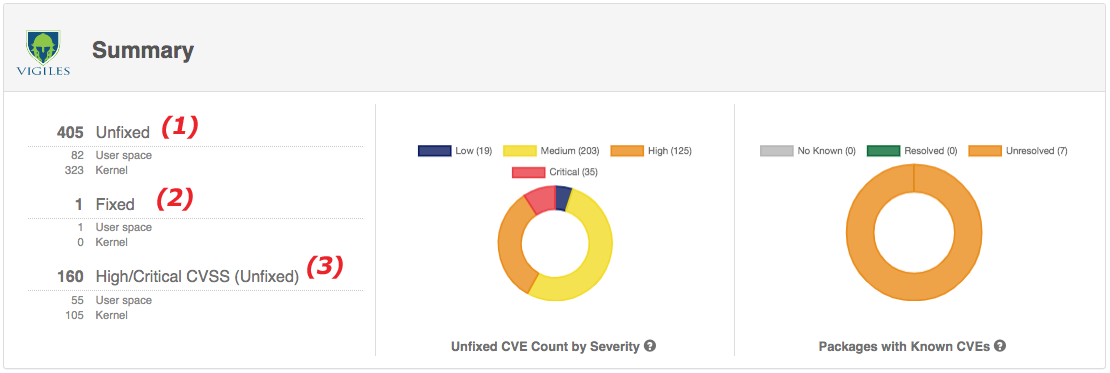
The summary will give you an overview of the vulnerabilities that apply to your SBOM.
- Unfixed: shows how many CVEs are unfixed in your current build. A mitigation may or may not exist for these vulnerabilities.
- Fixed: shows how many CVEs have been patched based on your manifest information. This information is only provided for manifests generated via build system and advanced CSV manifests with applied patches included.
- High/Critical CVSS (Unfixed): shows how many CVEs that have a CVSS Score of 7 or greater on a scale of 0 to 10.
2. Packages Section

The packages section summarizes the CVEs again, but broken down by package.
- Note the checkbox for Show Unfixed Only.
- The packages are listed here. Clicking on the package names will apply a filter to the CVE section, only showing that package’s CVEs. You can clear the filter using the options in the CVE section.
- You can quickly visualize where the high severity CVEs are located.
- You can also see how many of the known vulnerabilities you have fixed or whitelisted.
- Note that the packages list is paginated.
3. CVEs Section

Now we get into the important details. The CVE section will list the vulnerabilities that were found. You can filter this list down to speed up your workflow.
- The “Show CVEs with alerts only” will filter to only CVEs that triggered alerts that you set. These can be based on CVSS score, custom scoring, or package license triggers.
- The filter pulldowns will allow you to narrow down your review of the vulnerabilities. The Minimum CVSS filter may be applied already to your report.
- Kernel Config and U-Boot Config can make a huge impact on your reported vulnerabilities! Try to take advantage of this feature by either using the build integration or adding the config information to your manifest.
- Expand the rows to access suggested fixes, patch links, add notes, and whitelist any CVE you will not be mitigating. For kernel and U-Boot vulnerabilities, config options that will mitigate the vulnerabilities will be shown here.
- The Fixed Version will tell you the minimum package version that includes a fix for the CVE. When no version is given, you’ll have to check the CVE.
- Clicking on the CVE will take you to a Timesys page with more detailed information about that CVE.
- Status will show whether or not the vulnerability is Fixed, Unfixed, or Whitelisted in your manifest.
- This shows the CVSS score for the CVE. CVSSv3 is used when possible.
- Attack Vector will give you the context in which a vulnerability can be exploited.
- You can add custom scoring here to help with your triage.
Get a feature walk-through that focuses on your use case.
Want to see a demo or specific features? Or discuss your use case to get a focused idea of where Vigiles fits into your workflow?
Fill out the form to schedule a free consultation. We’ll be happy to help answer your questions.
* Denotes required field.
Additional Resources


Copyright © 2018-2021 Timesys Corporation. All Rights Reserved. Privacy Policy | Cookie Policy | Support Policy | Eula | Terms of Service | Terms of Sale 


All company and product names mentioned and marks and logos used are trademarks and/or registered trademarks of their respective owners.